Your blender is a workhorse. It turns ice into snow, smashes nuts into butter, and purees soups in seconds. But when it stops spinning, that convenience turns into frustration. Most people assume a broken blender means a trip to the store for a new one. That is rarely true.
Inside the plastic or metal base sits a motor, a switch, and a drive system. These parts fail. Usually, they fail because of neglect. Overloading the jar with hard ingredients at low speeds burns out motors. Letting seals dry out or crack lets leaks into the motor housing. Fixing it yourself saves money and waste. It also keeps your kitchen running.
Зміст
Why Blenders Fail
Blenders are simple machines. A motor shaft spins a blade assembly inside a jar. You control the speed by adjusting the current to the motor. Turn the dial or press a button, and more electricity flows. The blade spins faster.
Two things kill blenders.
First, overload. Dropping a frozen block into the jar and hitting the lowest speed setting is a recipe for disaster. The motor stalls. It draws too much current. It overheats. The windings burn out.
Second, leaks. The jar holds liquids. The base holds electricity. They meet at the bottom. Seals keep them apart. If a seal cracks, water seeps into the coupling. It reaches the motor. Short circuits follow.
Preventive care is key. Keep seals tight. Do not fill the jar past the max line. Use high speeds for hard foods. If you ignore these rules, repairs become inevitable.
Common Repair Steps
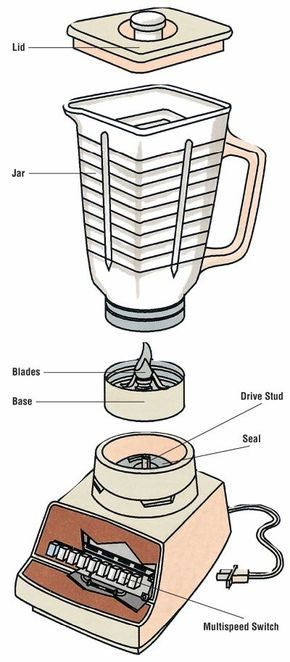
Fixing a blender involves a few specific tasks. You might need to service the multispeed switch. You may need to replace a fuse. Sometimes the drive stud is loose. Other times, the blade assembly needs attention.
The multispeed switch is a common failure point. It takes a beating. Every time you change speeds, it clicks. Over time, contacts wear. Terminals loosen. Here is how to check and fix it.
Step 1: Remove the Base
Unplug the blender. Always. Safety first.
Flip the blender base over. Look for screws on the bottom. Remove them. Some models use clips instead. Gently pry the cover off. Do not force it. Plastic clips break easily. Keep screws in a safe place. You will need them later.
Step 2: Inspect the Switch
Once the cover is off, you see the internals. The multispeed switch is usually attached to the base with clips or screws. It might be visible from the faceplate or buried inside.
Look closely. Do you see loose terminals? A wiggling terminal often causes intermittent power. Tighten it. If the terminal is blackened, that is a sign of arcing. Arcing means electricity jumped a gap. It creates heat. It melts plastic.
Check the wires too. Are they frayed? Burnt? These are visual clues to the problem.
Step 3: Test Continuity
Visual inspection is not enough. You need to know if the switch is electrically sound.
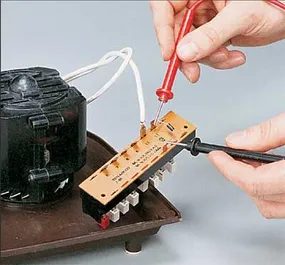
Use a continuity tester or a multitester. Set it to the ohms setting. Touch the probes to the switch terminals. Follow the manufacturer’s diagram if you have it. If the switch is closed, the tester should beep or show near zero resistance. If it shows infinite resistance, the circuit is open. The switch is dead.
A faulty switch means no power to the motor. Even if the motor is fine, the blender will not work. Replacing the switch is often cheaper and easier than replacing the whole unit.
A loose terminal can mimic a dead switch. Always check connections before assuming parts are broken.
This
Cleaning the Moisture-Prone Power Switch
The power switch lives on the front of the unit. It’s right in the splash zone. Liquid spills here are common. They cause corrosion or short circuits. Don’t just wipe it down. Clean it properly.
Use compressed air to blow out debris. For stubborn grime, try electrical contact cleaner. Spray it into the mechanism. Let it dry. If the button still feels sticky or unresponsive, the switch is likely shot. Replace it. It’s a small part. It’s cheaper than a new blender.
Testing and Replacing the In-Line Fuse
Most blenders have an in-line fuse. It sits between the multispeed switch and the motor. Its job is simple. It blows if the motor draws too much current. This saves the motor from burning out.
If your blender won’t turn on, check the fuse first.
- Access the fuse. Remove the base. Find the wire running from the speed switch to the motor. The fuse is on that wire.
- Disconnect and test. Pull the wire off one side of the fuse. Use a continuity tester or a multitimeter. Set it to the ohms setting. Touch the probes to both ends of the fuse. If you get no reading (open circuit), the fuse is blown.
- Replace it. Get a fuse with the exact same rating. Don’t guess. Wrong amperage can damage the motor.
Diagnosing Motor Failure
Motors are tough. They last years. But they aren’t indestructible. If the motor fails, repair might cost more than replacement. Test it before you give up.
You need an ohmmeter. It’s usually built into a multitester. The circuit runs from the plug, through the controls, into the motor, and back.
- Probe the prongs. Put one meter probe on each prong of the power cord.
- Activate the controls. Press a speed button. Or turn the dial slightly. Watch the reading.
- Check for changes. Rotate the drive stud clockwise by hand. If the resistance reading changes, the motor is failing.
If the reading doesn’t change or acts erratic, the motor is bad. Take it to a repair shop for a quote. Often, that quote will exceed the price of a new blender.
Fixing a Loose Drive Stud
The motor spins fine. The blade does not. Why? The drive stud is loose. It connects the motor shaft to the blade assembly. Over time, vibration loosens it.
To tighten it:
- Flip the unit. Remove the base. Turn the blender upside down. The drive shaft sticks out from the bottom.
- Grip the shaft. Use pliers or a wrench on the exposed shaft end to hold it steady.
- Tighten the stud. Turn the blender on its side. Reach under with a wrench on the drive stud. Turn it clockwise. Hold the shaft tight. Don’t strip the threads.
If the corners of the stud are rounded off, tightening won’t help. You need a new stud. Reverse the tightening steps. Remove the old one. Install the new one. Tighten firmly.
The Blade Assembly
The blade assembly is straightforward. It’s just metal and plastic. The drive stud pushes it. It spins. It chops.
If the blades are dull, they won’t crush ice. If the seals are cracked, liquid leaks. Inspect them regularly. Clean them thoroughly after use. Food particles harden. They jam the mechanism.
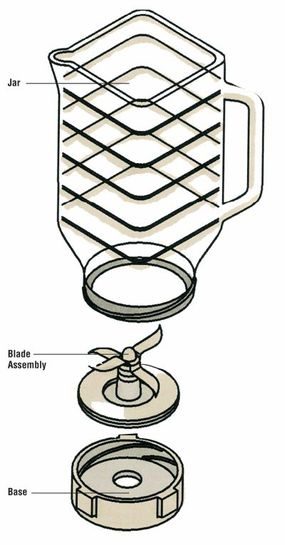
Sealing the Leak
Water pooling under your blender base isn’t just annoying. It’s a sign your seal has failed. The first fix is usually simple. Tighten the jar onto the drive stud. Make sure it’s seated straight. If liquid still weeps out, the rubber gasket is compromised.
Gaskets wear down over time. Heat and friction break them down. Pull the jar off. Check the ring for cracks or warping. Replace it if it looks brittle. A new gasket costs pennies. It saves you from replacing the whole unit.
The Slipping Drive Stud
Here is the issue many people miss. The motor spins. The drive stud turns. The blade assembly just sits there. Nothing happens. This disconnect is common in older blenders. Specifically those with metal drive studs and plastic sockets.
The plastic socket wears out. It becomes rounded. The metal stud slips inside instead of gripping. You can’t fix this by tightening. The mechanism is stripped. You need to replace the blade assembly socket. Or the entire blade assembly.
Check your warranty first. Some manufacturers cover this. If not, look for replacement parts online. Match the model number exactly. Generic parts often fail faster. Stick to OEM if you can.
Electric Can Openers
Blenders aren’t the only kitchen gadget that quits on you. Electric can openers are next on the list. They have their own set of failures. We’ll cover how to repair them next.
Troubleshooting Chart
Still stuck? You might need a broader view. A troubleshooting chart can help. It walks you through symptoms and solutions.
Click here for a troubleshooting chart that just might solve the problem.