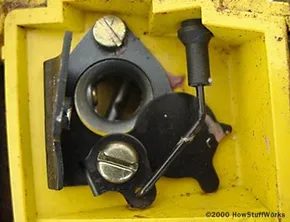
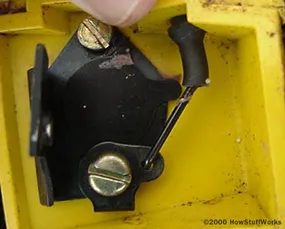
Don’t let the name fool you. The choke isn’t some complex, high-tech component. It is simply a plate. That’s it. A flat piece of metal or plastic positioned to restrict airflow. Nothing more. When you pull the cord, you aren’t activating a computer. You are physically closing a valve to change the fuel-air mixture.
This simplicity is why small engines are so durable. Look at the mechanics. A single plate obstructs the air intake. That restriction creates a vacuum effect, pulling more fuel into the combustion chamber. This is critical for cold starts. Cold fuel doesn’t vaporize well. You need a richer mixture to get things moving. Once the engine warms up, the plate opens. Airflow increases. The mixture thins out. The engine runs normally.
If you want to see exactly how this works, watch the short video attached to the original piece. It is only half a megabyte. It shows the choke in action without any fluff. You will see the plate move. You will see the air flow change. It is easy to understand.
Зміст
The Pull-Cord Assembly
Removing the pull-cord assembly reveals the inner workings. You might expect to find gears. Or springs. Or wires. Instead, you find a self-contained unit. This housing holds the spool and the spring that powers the recoil starter. But it also secures the choke linkage.
The choke mechanism is tied directly to this assembly. When you pull the cord, you are engaging both the starter and the choke. This design is common in older lawn mowers, weed eaters, and small generators. It saves space. It reduces cost. But it also means maintenance is straightforward.
If your engine won’t start, check the choke plate first. Is it stuck? Is it dirty? Carbon buildup can jam the plate closed or open. A stuck-closed choke floods the engine. A stuck-open choke makes cold starts impossible. Clean it. Lubricate the linkage. Test the movement.
Most DIYers ignore the choke. They assume it is broken. They buy a new carburetor. They replace the spark plug. They check the gas. The problem is often just a dirty plate. Or a stiff spring. Fixing it takes minutes. Not hours.
Think about the airflow. When the plate closes, air can’t get in. Pressure drops. Fuel is drawn out of the jet. More fuel enters the cylinder. This rich mixture ignites easier. That is the physics. That is the reason. You don’t need a manual to understand it. You just need to see the plate move.
Next time your engine sputters, look at the choke. Is it working? Or is it frozen? The answer usually lies in the simple mechanics of a single plate.
How the Flywheel and Pawl System Works
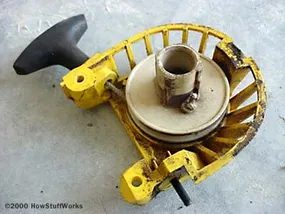
Look at the flywheel. Specifically, the two spring-loaded pawls bolted to it. They’re the key to turning a cold engine over without frying your starter motor.
The center shaft of your pull-start assembly slots right into these pawls. Normally, they spin freely. No engagement. Just free rotation.
But pull the cord? The mechanism kicks in. The springs compress, forcing the pawls outward. They catch onto the flywheel’s teeth. The friction holds. The engine turns.
The pawls are mounted on the flywheel, engaging only when you pull the cord to start the engine. Otherwise, they spin freely to prevent drag.
Why This Design Matters
You might wonder why a simple rope-and-pulley system is still used on older mowers, generators, and chainsaws. It’s cheap. It’s reliable. And it protects the battery.
Electric starters draw heavy current. If the engine is flooded or the battery is dead, you’re stuck. A pull-start doesn’t care about voltage. It cares about mechanical force.
The pawl mechanism acts as a clutch. When the engine fires, the flywheel spins way faster than you can pull. If the pawls stayed engaged, you’d be dragged backward. Or worse, the starter gear would shatter from the reverse torque.
The springs keep them disengaged once the engine catches. Free spin. No damage.
Checking Your Pawls
If your pull cord feels loose or the engine won’t catch, check the pawls. Remove the flywheel cover. Look for worn teeth or weak springs.
- Weak springs: The pawls won’t extend far enough to catch the flywheel.
- Worn teeth: The metal edges are rounded. They slip instead of grabbing.
- Debris: Dirt or grass clumps can jam the mechanism.
Clean it. Replace the springs if they’re fatigued. Snap the new pawls in place. Reattach the flywheel.
Pull the cord again. It should bite. Hard. The engine turns. You’re back in business.
Does your pull-start feel sluggish? Or does it just spin uselessly? The problem is likely right here.
The Flywheel and Magnet System
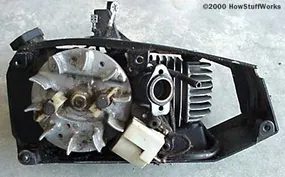
Look at that aluminum disc on the left. That’s the flywheel. It isn’t just a weight; it’s a fan. The blades spin, sucking in air and forcing it back around the combustion chamber fins. This airflow does the heavy lifting when it comes to cooling the engine block. Without it, you’re looking at a very hot, very dead saw very quickly.
But the flywheel has another job. Embedded inside are magnets. They interact with the white block sitting on the lower right side of the wheel. That white block is the magneto. It’s what generates the spark. No magnets, no spark. No spark, no fire. It’s that simple.
You can also see a hole located just above the magneto. That’s where the carburetor attaches. It’s the entry point for the fuel-air mixture before it hits the cylinder.
Stripped Down to the Core
We’ve gone further than just taking off the handle or the bar. The saw is now reduced to its bare engine, flanked by only three plates: the top cover, the bottom cover, and the front plate. It’s a skeleton.
Before we dive into the internal mechanics of the engine itself, we need to pause. There are three critical components sitting on this exposed block that dictate how the saw starts and runs. The clutch. The magneto. The carburetor.
We’ll look closely at how these three interact. They’re the interface between your pull-start and the combustion chamber. Understand them, and you understand half the battle.