You think you’ve got the hang of home improvement? Maybe you’ve hung shelves or patched drywall without crying. Now you’re staring at a box of ceramic squares and wondering if you’re in over your head. Installing tile is a serious step up from painting a wall. But it’s doable. You just need the right gear and a steady hand.
Before you touch a single tile, grab your supplies. You’ll need grout. Obviously. But also a bucket, latex additive or water for mixing, a grout sponge, a rubber float, and something to clean the tight spots like an old toothbrush. Don’t forget safety gear. Rubber gloves. Safety goggles. Kneepads. Your knees will thank you later. Always read the manufacturer’s instructions. Seriously. They know their product better than you do.
Think about who lives in this house. Does someone have allergies? Pets? Mobility issues? If someone uses a wheelchair, the type of tile matters. If you’re sensitive to chemicals, look for “green” options. Climate matters too. Humidity can warp materials. Pick what works for your life, not just what looks pretty in a magazine.
Tiling a kitchen backsplash is a smart investment. It’s cheaper than stone, tougher than paint, and easy to wipe down when spaghetti sauce splatters. Assume you’ve already laid the tiles and let the adhesive cure overnight. You’ve picked your grout—sanded or unsanded. Now comes the messy part.
Зміст
Grouting Kitchen Tile
Start by mixing your grout. If it’s dry powder, follow the bag instructions to the letter. You want a consistency somewhere between sour cream and peanut butter. Thick enough to stay put, thin enough to squeeze into the cracks. Adding latex makes it more durable.
Grab your rubber float. Hold it at a 45-degree angle to the grout lines. Scoop the mix and push it into the gaps. Run the float parallel to the joints first. Then go over the surface at that same 45-degree angle to pack it tight.
Let it sit for 15 to 20 minutes. You want it firm but not rock hard. Wipe the tile face with a damp cloth or sponge. Rinse that sponge constantly. Dirty water ruins the finish. Fill any gaps. Smooth the grout slightly below the tile surface using your finger or the handle of your toothbrush.
Wait another 45 minutes. A haze will form on the tiles. Polish it off with the sponge. Be gentle. Don’t scrub the grout out of the joints. If it’s still cloudy, let it dry longer. Hours later, buff it with a clean towel.
For the next three days, lightly mist the grout with water. This prevents it from drying too fast and cracking. Once cured, apply a sealer. It keeps out water, mildew, and stains. You’ll reapply this sealer every few years.
When you lay the tiles, mix batches from different boxes. Color can vary between batches. Blending them avoids a patchy look. Save leftover tiles for future repairs. You will need them eventually.
Grouting Floor Tile
Floor tile is tougher than backsplash. Wait two to three days for the mortar to set completely. Remove spacers. Vacuum or sweep the floor thoroughly. If the manufacturer says to use a presealer, do it now.
Wear your safety gear. Mix small batches of grout. You only have about 30 minutes to use it before it hardens. If it gets too stiff, toss it. Do not add water to reconstitute it. It’s trash.
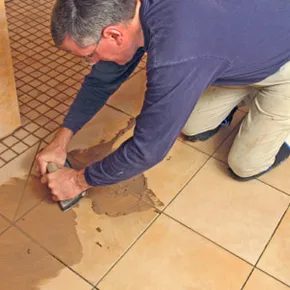
Start in a corner. Work toward the center. Spread the grout over the tile face. Use a squeegee or rubber float to force it into every joint. Scrape off the excess.
After 15 to 20 minutes, the grout is dry enough to clean. Wipe the tiles with a sponge and fresh water. Change the bucket water often. Dirty water leaves residue.
Decisions, Decisions!
You’ll live with this tile for years. Make three choices before you buy anything.
First, what tile do you want? Color matters. Design matters. Complex patterns are harder to install.
Second, what color grout? Dark grout makes the lines pop. Light grout blends in.
Third, how wide is the gap? If your joints are 3/16-inch (about 0.5 cm) or smaller, use nonsanded grout. Never use sanded grout for lines narrower than 3/16-inch. It won’t fit.
Are you leaning toward epoxy or acrylic? That’s a question for another time. For now, just get the basic job done right.
Epoxy Grout: Heavy Duty and Expensive
Standard grout is often cement-based and elastomeric, which is fine for caulk but not for serious tile work. If you need durability, you are looking at epoxy tile grouting. It comes in sanded or unsanded varieties and resists chemicals and stains aggressively.
Epoxy mixes two parts: hardener and epoxy resin. The bond is strong. Impact resistance is high. Dropping a pan won’t crack it easily. That is why factories and warehouses use it. It is expensive though. Usually four times the cost of cement grout.
You cannot use every epoxy mix. It fails if your tiles are over half an inch thick. It also fails if joints are smaller than a quarter inch. Avoid it there. Use it where grease hits the floor. Use it in high traffic zones. Acid spills happen in commercial kitchens. Epoxy handles that.
Old epoxy was a nightmare. You had forty-five minutes to spread it before it hardened. Now, newer formulas include detergents in the hardener. Cleanup is faster. Water works.
Some epoxy contains Portland cement. This makes it work like regular grout but with better strength. Choose based on your needs.
Do You Need an Additive?
Additives in fuel tanks don’t help engines. But in grout, they help. They improve flexibility. They boost strength after curing. Bonding gets better. Color stays true.
If you add them, mix them in when you start. Don’t skip this step if you want a long-lasting floor.
Acrylic Grout for Small Joints and Marble
Is epoxy your only option? No. Consider acrylic tile grouting.
Silicone additives come premixed with Portland cement grout. They improve adhesion. They handle freeze-thaw cycles. Outdoor decks and garages benefit from this. The grout retains its color. Stains resist better. Fast-food restaurants use this type of grout. Some companies make acrylic caulk to match tile or paint exactly.
Acrylic latex grout moves into tight spaces. Gaps under an eighth of an inch work well. Roughly half a centimeter. It is ideal for marble tiles. Sanded grout scratches marble. Acrylic does not.
It is also good for repairs. You do not need to cover the whole surface. Just apply it in the joints.
You can add acrylic latex mix to standard grout. It is a milky liquid. Replace water with it. Do not do this if your bag says “polymer-modified.” That grout already has the additives. You would be wasting money.
How to Choose Grout Color
Picking a color changes the look of the room. Think about the pattern.
Match the grout color to the tile. You downplay the geometry. The floor looks like a solid sheet.
Use a contrasting color. The pattern pops. Lines define the shape.
Think before you mix. The wrong choice makes a simple design look messy.
Where to Buy Supplies
You have reviewed the types. You know when to use them. Now go buy tiles and grout. Walk into the room later and be satisfied. The work will hold up. The colors will stay.
Related Topics
- What’s so special about Integrity Block?
- How Urban Landscape Design Works
- How is concrete made?
- How Skylights Work
- How a Daylighting Device Works
- How Using Pesticides in Landscaping Works