Making your own bedding isn’t just about saving money. It’s about getting the exact look you want without paying a premium for store-bought sets. A custom-made bedspread and dust ruffle takes less than a day to construct. It’s a straightforward project for anyone who can thread a needle and use a sewing machine.
You can customize the fabric to match any room. Guest rooms, kids’ rooms, or master suites all benefit from a tailored look. The result is a made-to-match set that feels personal and polished.
Зміст
Gather Your Tools and Materials
Before you buy anything, check your closet. You might already have what you need.
Tools:
– Tape measure
– Pencil or fabric marker
– Scissors
– Straight pins
– Sewing machine
– Steam iron
– Ironing board
Materials:
– Your choice of fabric
– Matching thread
– Old sheet or preshrunk muslin for the top panel of the dust ruffle
– Covered cording (optional)
– Woven trim or fringe (optional)
Expect to spend about 1.5 to 2.5 hours on the bedspread. The dust ruffle will take another 2 to 3 hours.
Measure and Buy the Right Fabric
Sizing is everything. If you cut too small, the spread won’t drape right. If you cut too large, you’ll waste fabric and have heavy fabric to manage.
For a Twin Bed:
You need 5 2/3 yards of fabric that is 36 to 45 inches wide.
For a Full-Size Bed:
You need 5 2/3 yards of 44- or 45-inch wide fabric.
For a King-Size Bed:
If using 44- or 45-inch wide fabric, buy 8 7/8 yards.
If using 54- to 60-inch wide fabric, buy 5 7/8 yards.
Lightweight fabrics might need a lining. An old sheet works perfectly. If you must buy new material, choose inexpensive muslin. Preshrink it before cutting.
For the Dust Ruffle:
You need a panel that covers the box spring top, plus 3/4 inch all around.
– Twin: 39 × 75 3/4 inches
– Full: 54 × 75 3/4 inches
– King: 76 × 80 3/4 inches
This panel hides between the mattress and box spring. Use an old sheet or preshrunk muslin. It doesn’t need to be pretty.
For the ruffle itself, you need:
– Twin: 4 1/8 yards of 44- or 45-inch fabric
– Full: 4 2/3 yards
– King: 5 2/3 yards
Cutting the Bedspread
Precision starts with straight lines. Square off the end of your fabric first.
Spread the fabric out. Make a small cut into the selvage near one end. Grasp one crosswise thread. Pull it gently. It will draw right out of the fabric, leaving a straight guide line across the width. Cut along this pulled-thread line. Discard the crooked end.
Now, measure down from the pulled-thread line. Mark your cuts. Cut straight across the fabric.
Twin Bed Cuts:
– Top piece: 32 × 102 inches
– Two side pieces: 18 × 102 inches each
Full-Size Bed Cuts:
– Top piece: 44 × 102 inches
– Two side pieces: 19 × 102 inches each
King-Size Bed Cuts:
For 44- or 45-inch wide fabric:
– Top piece: 44 × 110 inches
– Two side pieces: 30 × 110 inches each
For 54- to 60-inch wide fabric:
– Top piece: 54 × 110 inches
– Two side pieces: 27 × 110 inches each
The finished spread will tuck in at the sides and foot. It folds over the pillows at the head.
Sewing the Bedspread
Assemble the panels. Place a narrow side panel over the center panel. Right sides together. Match the long edges.
Pin the pieces together. Stitch them with a straight stitch. Stay 1/2 inch from the edge. Backstitch at the ends to secure. Remove pins. Press the seam open.
Repeat for the other side panel. Attach it to the other side of the top panel.
Once assembled, create a double 1/2-inch hem on all four sides. Start with the short sides, then move to the long ones.
Turn the raw edge under 1/2 inch. Press. Turn it under again 1/2 inch. Press. Pin it in place. Stitch near the inside edge. Backstitch at the ends. Remove pins.
Adding Style and Variations
Standard is fine. But why not make it yours?
Insert covered cording in the seams for a daybed look. Or cover the seams with woven trim. It adds texture and interest.
If you used a very light fabric, add a lining. Cut the lining from an old sheet or preshrunk muslin to match the spread panels. Lay the spread and lining wrong sides together. Treat them as one layer. Assemble as above.
Prefer a coverlet instead of a tuck-in spread? It hangs loosely over the dust ruffle.
Coverlet Cuts:
– Twin: Top piece 32 × 102 inches. Two side pieces 15 × 102 inches each. Finished size: 60 × 100 inches.
– Full: Top piece 44 × 102 inches. Two side pieces 16 × 102 inches each. Finished size: 75 × 100 inches.
– King (44-45 inch fabric): Top piece 44 × 110 inches. Two side pieces 27 × 110 inches each. Finished size: 97 × 105 inches.
– King (54-60 inch fabric): Top piece 54 × 110 inches. Two side pieces 24 × 110 inches each.
Make it exactly like the tuck-in spread. Round off the bottom corners if you like. Add fringe all around the edge for a bohemian touch.
Making the Dust Ruffle Center Panel
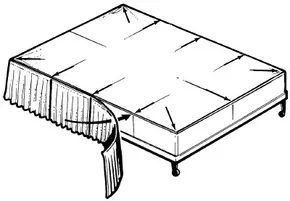
The ruffle has two parts. The panel goes on top of the box spring. The strip wraps around the sides.
Cut an old sheet to fit the panel dimensions listed earlier. Or seam lengths of preshrunk muslin together to get the proper width.
Take one narrow end of the panel. Turn the raw edge under 3/4 inch. Press. Turn it under again 3/4 inch. Press. Pin it in place.
Stitch the hem along the inside edge. Backstitch at the ends. Remove pins.
This panel will be hidden. But it provides the anchor for the ruffle. The strip will attach to this edge next. You’ll have a clean, professional look that hides the box spring completely. The bed will look finished. And you did it yourself.
Sizing the Fabric Correctly
Before you touch the scissors, make sure the fabric edge is square. Pull a thread from the edge and cut along that loose line. It’s the only way to get a true straight cut.
Measure and cut your ruffle panels. They need to be the full width of your fabric. The length? That depends on your bed height. Measure from the top of the box spring to the floor. Add 2 1/2 inches to that number. If that total is more than 14 inches, you’ll need wider panels and extra fabric.
Get your counts right. A twin bed needs nine panels. Full-size? Ten. King-size requires twelve. Each panel should be 16 1/2 inches long.
Sewing the Panels Together
Sew the panels end-to-end. Start with two panels, right sides facing each other. Match the 16 1/2-inch selvage edges on one end. Pin them. Stitch 5/8 inch from the edge. Pull the pins.
Open that double panel. Place a third panel on top of one of the two attached ones, right sides together again. Pin the free 16 1/2-inch edges. Stitch 5/8 inch from the edge. Unfold.
Keep going. Add panels accordion-style until you have one long strip. Press all the seams open. It lays flatter that way.
Hemming the Edges
Hem the narrow ends and one long side. Use a double 3/4-inch hem. Turn the raw edge under 3/4 inch. Press it flat. Turn it under another 3/4 inch. Press again. Pin it. Stitch it close to the inner fold. Remove pins.
Do this for every panel end and the single long hemmed side.
Gathering the Ruffle
Leave the top of the ruffle unhemmed. This is where the gathering happens. Loosen your upper thread tension. Lengthen your stitch. You want the thread to pull easily.
Place the ruffle right side up. Stitch two parallel rows along the top edge. One row 5/8 inch from the edge. The other 1/4 inch above that. Break your gathering threads at each seam along the ruffle. Start a new thread for each section.
Pull the bobbin thread with one hand. Slide the fabric with the other. Adjust the gathers until they look even.
Attaching to the Top Panel
Measure the distance around two sides and one end of your box spring. Divide that number by the number of panels. Nine for twin. Ten for full. Twelve for king. That’s your seam interval.
Attach the gathered ruffle to the plain top panel on three sides. The hemmed end stays loose because the ruffle doesn’t go around the head of the bed.
Mark the raw edges of the panel at your calculated intervals. Pin the gathered ruffle to the three raw edges, right sides together. Match the ruffle seams to your marks. If it doesn’t fit perfectly, pull or release the gathering threads.
Reset your machine tension and stitch length. Stitch all around the pinned edges. Work with the gathered fabric to avoid unwanted tucks or pleats. Backstitch at the ends.
Snip off the long gathering threads along the entire ruffle. Press the seam away from the ruffle. Topstitch 1/8 inch from the seam. You’re stitching through the pressed-up edges of the ruffle seam. The seam sits 5/8 inch from the box spring edge. It won’t show.
If you made a coverlet with fringe, add fringe to the ruffle edge too.
Putting It on the Bed
Slide the mattress off. Position the panel on the bed. Plain end at the head. Replace the mattress. Put on your bedspread.
Done.
Try making a tablecloth and napkins next. Use those same sewing skills.