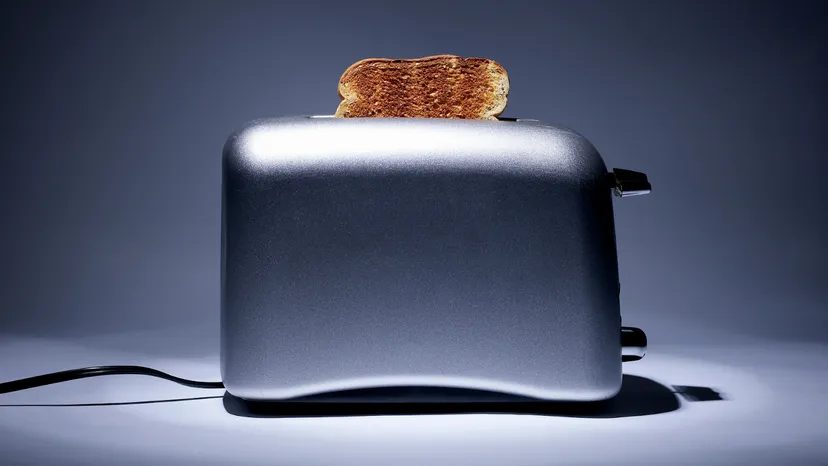
We use toasters every morning. Maybe you burn the bagel at lunch. It’s a ritual. The device itself? It looks like a simple box with slots. There is no magic involved. Just electricity and physics working together to turn soft, white bread into something crisp and golden.
But how does it know when to stop? Why does your bagel get darker than your sourdough? What happens inside the metal casing while you wait for that satisfying pop?
Most people just push the lever down and walk away. They don’t think about the springs, the bimetallic strips, or the heating coils glowing red in the dark. We are going to fix that. Let’s open up the anatomy of a standard pop-up toaster. We will look at the mechanics, the controls, and the simple engineering that keeps your kitchen (and your fingers) safe.
Зміст
The Heart of the Machine: Heating Elements
At the core of every toaster are the heating elements. These are not just random wires. They are carefully arranged coils of nichrome wire. Nichrome is an alloy of nickel and chromium. This isn’t chosen for its shine. It is chosen because it has high electrical resistance.
When electricity flows through the wire, it fights against the flow. That friction creates heat. Fast.
The heating elements in a toaster are made of nichrome wire, chosen for its high electrical resistance and ability to withstand extreme heat without oxidizing or breaking down quickly.
In a typical two-slice toaster, you will find four coils. Two for the left slot, two for the right. They are arranged in a serpentine pattern. This design ensures that the heat is distributed evenly across the entire surface of the bread. If the coils were just straight lines, you would get hot spots. Your toast would be charred in one place and cold in another. The zig-zag pattern solves this.
These coils are supported by a ceramic or mica frame. Ceramic is an excellent insulator. It holds the wires in place while preventing the electricity from jumping to the metal housing of the toaster. Safety first. You do not want your toaster to electrocute you while you butter your toast.
The Mechanism: Springs, Levers, and Locks
Pushing the lever down is the most intuitive part of using a toaster. But the mechanism inside is surprisingly complex. It relies on tension and gravity.
When you press the lever, you are compressing a strong spring. This spring is connected to a carriage—the part that holds the bread. The spring stores potential energy. It wants to expand. It wants to push the carriage back up. But something is holding it back.
This is where the latch comes in.
The latch is a simple mechanical lock. When you push the lever down, the latch catches the carriage. It holds the bread down against the heating elements. The toaster is now “on.” The heating elements glow red. The browning process begins.
But what stops the toast from burning? How does the toaster know when the bread is done?
The Timer: How Toasters Know When to Pop
There is no computer inside a standard toaster. No chips. No sensors. Just a bimetallic strip.
A bimetallic strip is made of two different metals bonded
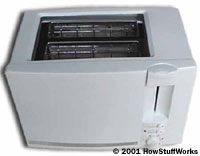
You can pick up a basic toaster at a discount store for under twenty dollars. Some models let you dial in the darkness level or defrost frozen bagels. But the device itself is surprisingly simple.
At its core, a toaster relies on infrared radiation. This is the same heat energy that warms your skin on a sunny day, though toasters use it for browning bread. When you push down the lever and see those coils glow cherry-red, they aren’t just getting hot. They are actively radiating energy that dries out the crust and chars the surface.
The secret to that glow lies in the heating element. Most toasters use nichrome wire. This is an alloy of nickel and chromium, chosen because it has high resistance and doesn’t oxidize quickly at high temperatures. The wire is wound back and forth across a mica sheet. Mica is a mineral that handles heat well and acts as an electrical insulator. It keeps the live wires from touching the metal casing or each other, which would cause a short circuit.
“The radiation gently dries and chars the surface of the bread.”
This setup is efficient because nichrome wire reaches high temperatures without burning through. The mica provides structural support and insulation. Together, they create a reliable heating coil that lasts for years.
If you ever open a broken toaster, you might see this coil. It looks like a tightly wound spring of rusty-looking wire. Do not touch it. Even unplugged, capacitors can hold a charge. And if the mica cracks, the safety margin shrinks. That’s why most manufacturers seal the element inside the chassis. You don’t need to access it. You just need to know how it works when your morning routine goes sideways.
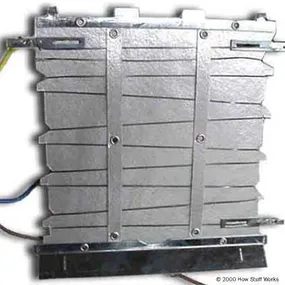
The Heat Source Explained
At its core, a toaster is just a resistor that gets hot. That resistor is almost always nichrome wire. It is an alloy made of nickel and chromium. This specific mix does two things incredibly well. First, it has high electrical resistance. Copper conducts electricity so well that a toaster made of it wouldn’t heat up enough to brown bread. Nichrome resists the flow. That resistance creates heat. Even a short length of it gets hot enough to char a crumb.
Second, it doesn’t oxidize. If you used iron wire, it would rust instantly at toaster temperatures. The chromium in nichrome forms a protective layer. It stays stable. It lasts.
The Bare-Bones Concept
Imagine the crudest possible toaster. Take two sheets of mica. Wrap nichrome wire around them. Space them about an inch apart. Plug it directly into the wall.
Here is the process:
– Drop bread into the slot.
– Plug it in.
– Stare at the bread.
– Unplug it when it looks dark enough.
– Turn the whole thing upside down to shake the toast out.
Most people find this inefficient. And messy. Crumbs everywhere. So manufacturers added mechanisms. Specifically, a spring-loaded tray and a timer.
The Spring-Loaded Tray
The tray is the mechanical heart of the convenience. It uses a spring mechanism. When you push the lever down, you compress that spring. It stores potential energy. You are essentially locking the bread in place against the heating element.
“The spring-loaded tray is what separates a home appliance from a laboratory experiment.”
Without this spring, you’d have to manually remove the bread while it’s hot. Or wait for it to cool. The spring holds the pressure. It keeps the bread flat against the guides. This ensures even heating. It also keeps the bread from floating up due to convection currents before you’re ready for it.
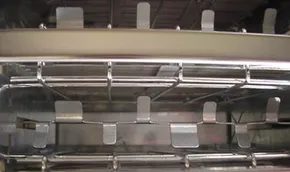
Peering down into a toaster slot reveals a surprisingly simple ecosystem. On either side, you see sheets of mica and nichrome. These aren’t just decorative; they are the engine of your breakfast. The mica acts as an insulator, keeping the heat contained where it matters. The nichrome wire, coiled tight against that mica, is where the magic happens. It resists electricity, turning electrons into radiant heat.
A metal carriage rides along these tracks. When you push the lever, this carriage drops the bread into the fiery abyss. It’s a straightforward mechanism, but there is more going on beneath the surface.
The Grate System Keeps Bread Centered
Most toasters don’t just let the bread flop around. There are grates on either side of the slot. These metal bars press against the sides of your slice. They keep the bread centered so the toast is even. If you’ve ever wondered why some toasters burn the edges while leaving the middle cold, the grate alignment is often the culprit.
The beauty of this design lies in its passive trigger. You don’t need a motor.
Two metal springs sit tucked away near the bottom of the slot. As the carriage descends, it eventually hits a point where these springs get compressed. That pressure pulls the grates inward. This clamping action does two things. It holds the bread steady. It also helps ensure the bread stays flat against the heating elements.
The springs translate the downward motion of the carriage into lateral pressure, centering the bread without any electronic input.
The Linkage Between Lever and Carriage
The carriage in each slot isn’t isolated. It is mechanically linked to the main lever you push. That single handle controls everything.
When you depress the handle, you are manually engaging a linkage system. This system connects to the carriage in every slot simultaneously. Push down once, and every slice of bread drops into position. This synchronization is key for consistent toasting. You aren’t managing individual slots. You are managing the whole machine with one motion.
The simplicity here is intentional. Fewer moving parts mean fewer things to break. But it also means the mechanism must be robust. A jammed carriage can ruin a toaster instantly. That’s why the rails are often coated or polished to reduce friction.
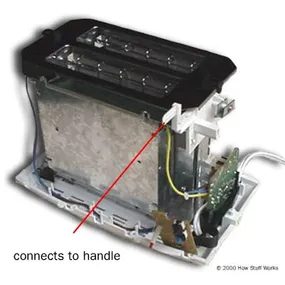
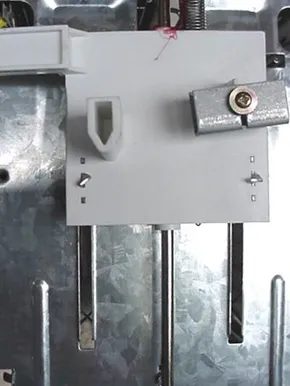
The Mechanics of the Drop
Push that lever down. Just three things need to click into place before bread ever sees heat.
First. A latch has to grab the handle. It holds everything tight. The toast stays buried.
Second. The circuit closes. Power rushes to the nichrome wires. They glow.
Third. A timer counts down. When the seconds hit zero, the latch releases. The springs take over. The bread flies up.
In this specific model, two jobs are fused into one piece: the handle.
It isn’t just a grip. It is the switch. And it is the lock.
Key Insight: In many basic toasters, the handle acts as both the manual trigger for power and the mechanical anchor for the heating cycle.
The design is elegant in its simplicity. You don’t separate the function. You don’t have a button for power and a separate lever for timing. The physical act of pushing down completes the electrical connection. It also engages the locking mechanism.
If that handle feels loose, the connection might be faulty. If it sticks, the latch is likely gummed up with crumbs. Crumbs are the enemy here. They jam the springs. They block the thermal cut-off.
Keep the interior clean. Check the handle’s tension. A stiff handle means a stuck switch. A wobbly one means a broken spring. Both lead to burnt toast or a fire hazard.
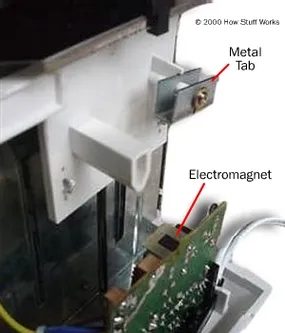
Pop the lever down. It’s a satisfying snap, but what actually happens inside is a bit of mechanical sleight of hand. You aren’t just pressing a button; you are engaging two distinct systems that need to talk to each other.
First, look at the plastic bar. It’s the trigger. When you push it, that bar presses down on a pair of contacts on the circuit board. Simple enough. Those contacts close the circuit, sending power to the nichrome wires. They glow. The heat starts. But if that were the only thing happening, your bread would burn to a crisp before you could spread butter. That’s because the toaster needs a way to know when the bread is done.
That brings us to the metal piece attached to the handle. It doesn’t just sit there for decoration. It’s part of the timing mechanism.
The Magnet Hold-Down
Here is where it gets interesting. That metal piece isn’t just structural; it’s magnetic. As you push the lever down, it gets pulled toward an electromagnet. This is what holds the toast down. Without it, the springs that launch the bread back up would push the lever right back to the “up” position before the heating element even had a chance to work its magic.
The electromagnet acts as a brake, keeping the mechanism engaged long enough for the browning process to complete.
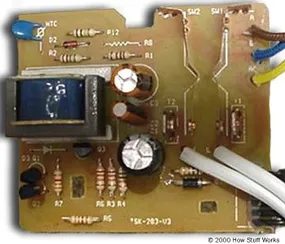
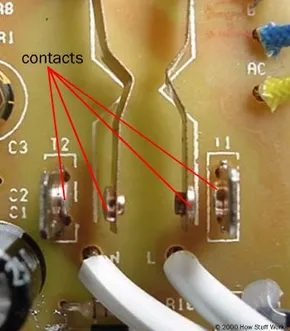
Look at the components closely. On the left, you have that green block. That’s the electromagnet. It’s the brain of the delay. On the right, those copper strips are the contacts. They’re the muscles. When the plastic bar activates them, electricity flows. But the electromagnet? It’s the timer.
Why the Delay Matters
You might wonder why a simple spring doesn’t just hold the lever down until the bread is cool. The answer lies in the bimetallic strip, which usually works in tandem with this setup. But looking at just this assembly, the role of the electromagnet is clear: it overrides the spring.
The spring wants to pop everything up immediately. The electromagnet says, “Not yet.” It holds the metal piece in place. Once the bread reaches the desired doneness, the bimetallic strip (located elsewhere in the assembly, but triggered by the same heat cycle) bends. This breaks the circuit to the electromagnet.
Suddenly, the magnetic hold vanishes.
The spring, still full of potential energy, takes over. It throws the lever up. The metal piece releases. The toast flies out. It’s a brutal, efficient system. No computers. No screens. Just physics and electricity working in a tight loop.
The copper contacts you see? They wear out. They arc over time. That’s why toasters eventually die—they stop making good contact, and the power never reaches the wires. But as long as those strips are clean and the electromagnet has juice, the dance continues. Push down. Heat up. Wait. Pop.
The Power Disconnect Mechanism
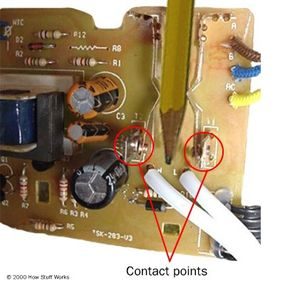
The next step in understanding how a toaster shuts down involves the plastic bar. Two photos demonstrate how this component applies power to the toaster. In the first image, the plastic bar is simulated by a pencil. You can see how it pushes the contacts apart.
This action breaks the electrical circuit. When the contacts separate, electricity stops flowing to the heating elements. This is a critical safety feature. Without this mechanism, the toaster could overheat. The plastic bar ensures the bread pops up before the circuit is fully broken. It creates a controlled pause.
The pencil simulation makes the movement easy to follow. It highlights the physical separation. The contacts must not touch again until the cycle resets. This design prevents accidental re-engagement. It keeps the user safe from electric shock.
“The plastic bar ensures the bread pops up before the circuit is fully broken.”
In the second photo, the bar is in its final position. The contacts remain separated. This confirms the circuit is open. The toaster is now in standby mode. You can remove the toast safely. The mechanism relies on simple physics. Force applied to the bar creates separation. No electronics are needed for this basic function.
However, modern toasters may add sensors. These sensors monitor temperature. They work in tandem with the mechanical bar. The bar provides the primary disconnect. The sensors provide precision. Together, they prevent fires. This combination is standard in most brands. It is a proven design.
If you are repairing a toaster, check this part. Look for wear on the plastic bar. A cracked bar may not push hard enough. The contacts might stay connected. This is a fire hazard. Replace the bar if it shows signs of damage. Use a multimeter to test the continuity. Ensure the contacts open completely. This simple test can save your kitchen.
The design is elegant in its simplicity. It uses minimal parts for maximum safety. No complex programming is required. Just a piece of plastic and two metal springs. This is why old toasters last so long. There is little to break. The plastic bar is the heart of the system. Treat it with care.
The Electronic Timing Circuit
You push the lever down. The plastic bar inside presses against electrical contacts, closing the circuit. 120 volts hit the nichrome wires. They start glowing.
But there is a secondary circuit. It uses transistors, resistors, and capacitors. This little group of components powers an electromagnet. The magnet grabs the metal piece attached to your handle. The bread stays down. It toasts.
Here is the trick. The circuit acts as a timer. A capacitor charges through a resistor. It takes time. When the voltage hits a specific threshold, the circuit cuts power to the magnet. The spring, which has been waiting, snaps. The bread launches upward. The plastic bar rises and breaks the main power connection.
Darkness Control Mechanics
How do you decide if you want light or dark? In this design, it is a variable resistor. You are changing the resistance. This alters how fast the capacitor charges.
Higher resistance? The capacitor takes longer to charge. The magnet holds on longer. Darker toast.
Lower resistance? The circuit trips faster. Lighter toast.
The Bi-Metallic Alternative
Simpler, older toasters do not use this electronic timer. They rely on a bi-metallic strip. This is two metals bonded together. They expand at different rates when heated.
As the toaster heats up, the strip bends. Eventually, it trips a mechanical switch. This kills the electromagnet. The bread pops.
This method has flaws.
If your kitchen is cold, the strip starts from a lower temperature. The first slice takes longer to reach the tripping point. That first piece gets too dark.
Try to make a second batch immediately. The toaster is already hot. The strip is already close to bending. The second slice pops too soon. It comes out underdone.
The electronic circuit avoids these temperature swings. It provides consistent timing regardless of the room’s ambient heat.
More on Toasters and Toast
If you want to dig deeper into the physics or the history, look into these areas.
Related HowStuffWorks Articles
- How Thermometers Work
- How Electromagnets Work
- How Light Works
- How Bread Works
- How Sourdough Bread Works
- How Coffee Makers Work
- How Grills Work
- Appliance Quiz
More Great Links
- The Toaster – short history
- The International Central Services Toaster Museum
- Toaster.org: The Toaster Museum
- Toaster Central: Antique, Vintage, and Collectible Toasters
- Epinions.com: Toasters
- Toaster Recipes
- Toaster: Deconstructed