


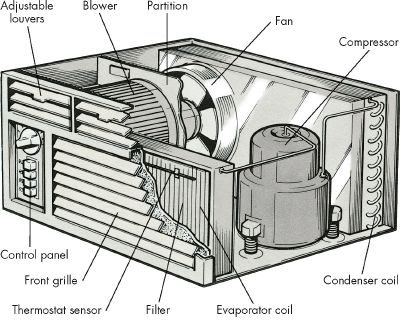
Think of a window unit as a miniature version of your central air system. Same basic mechanics. Smaller footprint. Often more expensive to run per degree of cooling. Depending on the BTUs and the layout, it might chill just the bedroom it sits in. Or it might push cool air into the hallway and adjoining spaces.
The magic happens inside. You have a compressor sandwiched between coils. Two fans spin. A motor drives the action. Thermostat controls keep things from swinging wild.
But here’s the problem. Dirt hates efficiency. It is the silent killer of window air conditioners.
When dust builds up, things go wrong fast. The evaporator coil loses its ability to absorb heat. The fan that blasts cold air into your room gets blocked. Filters clog up, turning into breathable barriers you’d rather not face. Drain ports get jammed. Water pools. Mold starts. You stop getting cool air.
Keeping these components clean isn’t just about comfort. It’s about keeping your electricity bill from spiraling. A dirty unit works harder. It draws more power. It lasts less time.
Start by checking the filters. They’re usually right behind the front grill. Pull them out. If they’re gray with lint, wash them. If they’re falling apart, replace them. Simple as that.
Don’t ignore the fins on the coils. Bend them. They need to stand straight to catch heat. Straight fins mean better airflow. Bent fins mean restricted flow and colder performance.
Зміст
Safety First: The Capacitor Danger
Before you even think about lifting the casing, look at the plug. Is it out of the wall? Good. Now, do not touch anything inside yet.
Room air conditioners are sealed units. The compressor, motor, and coils are locked away for a reason. You aren’t fixing those. If you crack that seal, you’re voiding warranties and risking serious injury. But the control panel? That’s fair game.
Here is the catch: capacitors.
They sit behind the control panel, near the fan. They store electricity. Even when the unit is unplugged, even when it’s been off for days. If you touch a charged capacitor, you will get shocked. Hard.
“Before you do any work on an air conditioner, unplug it and discharge the capacitor or you could receive a severe shock.”
Check your owner’s manual. It tells you where they are and how to safely discharge them with an insulated screwdriver. If you don’t have a manual? Call a pro. Do not guess with high-voltage storage components.
DIY Maintenance: What You Can Actually Fix
Once you’re safe, look at the symptoms. Most “broken” ACs are just dirty or misconfigured. You don’t need a service call for these.
The Filter
A clogged filter is the number one killer of cooling performance. Air can’t flow. The coil freezes up. Efficiency drops.
* Pull the filter out.
* Vacuum it.
* Wash it with warm water and mild soap if it’s reusable.
* Let it dry completely before sliding it back in.
Do this every two weeks in peak summer. It takes five minutes. It saves hundreds in electricity.
The Coils
The evaporator coil (inside) and condenser coil (outside) need to breathe. Dust acts as insulation. It traps heat instead of letting it dissipate.
* Use a vacuum with a brush attachment to gently remove lint from the fins.
* For deeper grime, use a coil cleaner spray. Let it foam up. Rinse with a gentle stream of water from the inside out if possible, to push debris out, not deeper in.
* Straighten any bent fins with a fin comb. Bent fins restrict airflow.
The Outside
Make sure the condenser isn’t choked. Leaves, grass clippings, and dirt baffle the airflow. Clear the area around the rear of the unit. Give it at least six inches of clearance on all sides.
Winter Storage
You’re not going to use this unit from November to March. Leaving it exposed to rain, snow, and freezing temps is a recipe for corrosion and cracked housings.
You have two options:
1. Remove it. Take the whole thing out of the window. Store it in a dry garage or shed. This is the best option. It protects the window seal too.
2. Cover it. If you must leave it in, buy a commercial AC cover or use heavy-duty plastic sheeting. Secure it tightly with duct tape or bungee cords. Wind is the enemy here. If water gets inside, it freezes and expands. That breaks the casing.
Troubleshooting: Quick Fixes for Common Failures
When the heat hits and the AC quits, don’t panic. Look at the problem.
Unit Won’t Start
* Check the power. Is the plug loose? Is the outlet dead? Try a lamp in the same socket to verify.
* Check the breaker. A tripped circuit breaker at the main panel is common. Reset it. If it trips again immediately, you have a short. Call a pro.
* Motor overload. If the unit hums then dies, the thermal overload protector may have kicked in. Wait 30 minutes. Press the reset button (usually red, on the control panel). If it holds, run it. If it trips again, the motor is failing.
Cooling is Weak
* Thermostat setting. Is it set too high? Lower it by 5 degrees.
* Dirty filter/coils. See above. Clean them.
* Blocked airflow. Is something blocking the rear exhaust? Clear it.
* Compressor/Coil damage. If the air is lukewarm and the coils are clean, the compressor might be dead or there’s a refrigerant leak. Do not attempt to fix these. You need a licensed technician.
Fan Runs, But No Cold Air
* Thermostat fault. The fan might run because it’s set to “Fan Only.” Switch to “Cool.” If it still doesn’t cool, test the thermostat. Replace it if faulty.
* Coil blockage. Again, clean the coils.
Fan Doesn’t Run (But Unit Cools)
* Switch position. Check the control switch. It might be set incorrectly.
* Clogged fan. Remove the front grill. Clean the fan blades. Tighten the blade hub if it’s loose.
* Bent blades. Straighten them gently.
* Faulty motor. If the blades are clean and straight but still don’t spin, the motor is dead. Replace the motor or call a pro.
Unit Short-Cycles (On/Off/On)
* Dirty coils/filter. This is almost always the cause. The unit overheats, shuts off, cools down, turns on. Repeat. Clean everything.
* Faulty thermostat. If cleaning doesn’t work, the thermostat sensor might be erratic.
Most of these issues are maintenance, not mechanical failure. You can save the cost of a service call by simply keeping the unit clean and ensuring it has power. When the sealed components fail, though, that’s when you call the experts.
For now, unplug it. Check the plug. Breathe. You’ve got this.
Keep It Running Cool: Essential DIY Maintenance for Your Room AC
You don’t need to be an HVAC engineer to keep your room air conditioner from failing mid-July. Routine maintenance is the difference between a cool bedroom and a very expensive repair bill. Most issues stem from neglecting the basics: the filter, the coils, the power connection, and the drainage system.
Here is how to service these components yourself before the heat really sets in.
The Air Filter: Your First Line of Defense
Start with the filter. It’s the easiest win and the most critical for airflow. If the filter is clogged, the unit works harder, uses more electricity, and cools less effectively.
Clean or replace the filter at the start of every cooling season. During the season, do it once a month. If you live in a dusty area or have pets, bump that up to every two weeks.
Most room units use a washable filter that looks like a piece of sponge rubber. Here’s how to handle it:
– Remove the front grille.
– Take out the filter.
– Wash it with mild household detergent and water.
– Rinse it thoroughly.
– Let it dry completely before putting it back. Wet filters breed mold and restrict airflow.
If your unit uses a disposable filter (like a furnace filter), just toss it when it looks gray and replace it with the exact same type. Don’t guess on the size.
Power Cord Safety: Don’t Skip the Test
A frayed power cord is a fire hazard. It’s also a common reason why a unit simply won’t turn on. You can check the cord yourself, but you need a volt-ohm-milliammeter (VOM).
- Unplug the unit and remove the control panel to access the cord terminals.
- Unscrew the terminals from the cord.
- Attach a test wire across the bare lead wires on the cord side.
- Hook the VOM clips to the prongs of the plug. Set the meter to the RX1 scale.
If the meter reads zero, the cord is good. If it reads anything higher than zero, there is resistance. Replace the cord immediately. Do not try to tape it up. Electricity doesn’t care about your tape job.
Coils: Vacuum and Straighten
The evaporator and condenser coils sit behind the grille. They collect dust, lint, and debris, which acts as insulation. Insulation on a coil means poor heat exchange. Your AC runs longer, gets hotter, and consumes more power.
Vacuum these coils at the start of the season and monthly thereafter. Use a soft brush attachment to avoid bending the fins.
If the fins are bent, they block airflow. Use a fin comb to straighten them. You can buy these at most appliance parts outlets. The comb slides between the fins to realign them. Go slow. Aluminum fins are thin and tear easily. If you bend one, you might have to straighten three to get the flow right.
A straight coil matters more than a perfect vacuum. Airflow is king.
The Selector Switch: Burn Marks Tell the Story
The selector switch turns the unit on. It sits directly behind the control panel. If your AC isn’t receiving power but still won’t run at any setting, the switch is likely the culprit.
Remove the control panel. Look at the switch terminals. Do you see burnt insulation? Black scorch marks on the terminals? If yes, the switch is faulty.
- Unscrew the old switch.
- Install a new one of the exact same type.
- Reconnect the wires to the corresponding terminals.
If you don’t see burn marks, the problem might be elsewhere. Call a professional. Don’t keep guessing.
Drain Ports: Stop the Leak
As the AC runs, moisture condenses on the evaporator coil. This water needs to go somewhere. It’s funneled through drain ports—openings between the evaporator and condenser coils. The fan blows this moisture against the condenser coil, where it evaporates into the air.
If those ports clog with dirt, water has nowhere to go. It leaks out the bottom of the grille.
Clean the drain ports monthly. Use a short piece of wire from a hanger or the blade of a pocketknife to poke through the opening. Keep it clear.
Some models have an additional drain port along the bottom edge of the cabinet frame on the condenser side. Check it too. If your unit has it, clean it every time you clean the others. A clogged secondary port is just as bad as a clogged primary one.
Motor and Compressor: Leave It to the Pros
If the motor or compressor acts up, stop. Do not try to fix these yourself. They are sealed units under high pressure. You need specialized tools and training.
Before you call a pro, though, double-check the thermostat. Sometimes the AC is fine; the thermostat is just misreading the temperature. We’ll cover how to test and replace the thermostat next.
For now, keep the filter clean, the coils straight, and the drain ports open. It’s simple work. It saves money. And it keeps you from sweating through the summer.
Testing and Replacing the Window AC Thermostat
The thermostat isn’t just a plastic knob. It’s the brain behind your window unit’s cooling cycle. If it fails, you’re sweating. Before you call a pro, check the thermostat. It’s usually the cheapest fix and the easiest DIY project you’ll tackle all summer.
Gather Your Tools
You need a few specific items. Don’t improvise with the wrong screwdriver. You’ll need:
– A standard screwdriver
– A volt-ohmmeter or multimeter
– A replacement thermostat (make sure it matches the old one’s specs)
The Diagnostic Process
Safety first. Unplug the unit before you touch anything. Internal components hold a charge, and shock is no joke.
-
Remove the grille and control panel. The thermostat lives behind here. Look for the sensing bulb. It’s a thin tube attached to the thermostat body. It snakes down into the evaporator coil area. Its job is simple: feel the air temperature. The thermostat reads that heat and clicks the compressor on or off.
-
Mark the bulb’s position. Before you pull the unit out, mark where the bulb sits. If you put it back in a slightly different spot, your readings will be off. You’ll cool the room too much or not enough.
-
Disconnect and test. Remove the thermostat carefully. Set your multimeter to the RX1 scale. Clip the probes to the two main terminals. Turn the dial to the coldest setting.
- Zero resistance? Good. The thermostat is closed and functioning.
- Any resistance above zero? Bad. The contacts are worn or the mechanism is stuck. Replace it.
If the new thermostat is held in place by screws or clips, hook it up exactly like the old one.
Note: If you see more than two lead wires (excluding the bulb wire), stop. Do not attempt this repair. Complex wiring requires a certified technician. Guessing can fry the control board.
Maintaining the Room Fan
Thermostats aren’t the only moving parts. The fan keeps air circulating. A noisy fan means a problem. A silent fan means a bigger problem. Most issues are minor. Dirt buildup or loose blades are the usual suspects.
Fan Repair Steps
You’ll need:
– Vacuum cleaner with a soft brush attachment
– Soft cloth
– Screwdriver or Allen wrench
– Long-blade screwdriver
– 20-weight nondetergent motor oil (specifically for motors, not general-purpose oil)
– Multimeter (for motor testing)
1. Access the Fan
Open the cabinet. Locate the fan assembly. It’s usually right behind the grille you removed for the thermostat check.
2. Clean It
Vacuum the debris. Use the soft cloth to wipe down the blades. Dust weighs down the fan. It throws off the balance. It causes vibration. Vibration causes noise. Noise causes premature bearing failure. Keep it clean.
3. Tighten the Blades
Check the setscrew at the hub of the blade. It sits on the motor shaft. If it’s loose, the blade will wobble. Tighten it with a screwdriver or Allen wrench.
If you have a round vent fan, you might need to insert a long-blade screwdriver through the port in the fan housing to reach the setscrew. Don’t force it. Just turn the screw until it’s snug.
Also, check the bolts holding the fan housing to the frame. Vibration loosens these over time. Tighten them with a wrench.
4. Lubricate (If Applicable)
Some fans have oil ports. If yours do, add a few drops of 20-weight nondetergent motor oil. Do this at the start of the cooling season. Regular household oil will gum up. Stick to the non-detergent type.
5. Test the Motor
If the fan still hums or doesn’t spin, the motor might be dead. Unplug the unit. Disconnect the terminal wires from the motor terminals. Set your multimeter to RX1. Clip the probes to the wires.
– Reading between 3 and 30 ohms? The motor is fine. The issue is likely capacitors or wiring elsewhere.
– Reading zero or extremely high? The motor is burned out. Replace it.
To swap the motor, remove the fan, disconnect the power wires, and unbolt the mounting bolts. Install the new motor in reverse order.
Warning: If the condenser coil blocks your access to the motor bolts, do not try to force it out. Bending the coil fins will reduce efficiency permanently. Call a pro.
Routine maintenance saves money. It keeps the unit running. It stops small issues from becoming expensive replacements. The fan and thermostat are the heart and brain. Treat them well.


