At the end of the 19th century, conditions on the prairie were harsh. The dunes of northwest Nebraska offer huge dunes covered in lush grass. It looks attractive, but it does nothing for the tree, which is the most necessary thing for any new homestead.
There are no trees. not really. The soil was too sandy and unstable to support the forests where the settlers relied on for framing houses, building fences, or burning for heat. You can’t just cut down a pine tree and call it a day.
Bringing wood is not an option either. Railroads have not yet reached these areas. No depots meant no deliveries. If you want a roof over your head, you have to build it from what’s under your feet.
The next obstacle is the soil itself. Of course, there is also grass. But it’s not just dirt. This is good quality, fertile topsoil. Such land produces abundant wheat and corn. Using it to build walls would waste prime agricultural property. These plants are needed to feed livestock and families. So the settlers had to be creative. They needed building materials that were abundant, cheap and did not eat up their farming potential of agriculture.
They found it in the grass for no other purpose.
Зміст
The science of sod construction
Sod is not just digging the ground. A living carpet woven from roots and soil. It is incredibly strong when properly cut. The roots act like natural iron rods that hold the earth together.
Cutting the sod requires special tools. The shovel is the most important tool. Must be sharp. A dull blade rips the grass away, leaving loose edges that won’t last. Settlers cut rectangular blocks, usually about 2 feet long and 6 inches thick.
“Sod houses is more than just a shelter; it’s an engineering feat based on available resources.”
This process requires a lot of effort. You have to lay the sod like bricks. Place each block root side down. This allows the roots to continue to grow a little and weave the walls over time. This enables the structure to self-heal to a certain extent.
Insulation is also an important factor. Dirt is a terrible conductor of heat. Thick sod walls keep the interior cool in summer and warm in winter. This is not a modern R-value, but it works. What are the disadvantages? It is very heavy. The base must be strong. Stones and rocks were often used as a foundation to support the weight of the earth walls.
Why Sod Was the Only Option
You might wonder why not try something else. Adobe? This requires clay, which is not always found in sandy soils. stone? Unusual for a sand dune. wood? does not exist.
Economics is simple. Each hour spent cutting sod is an hour not used for planting or harvesting. But without a home, the farm failed. This is a trade-off.
Safety is also an issue. Fire is really dangerous. Dry grass and dirt walls are not suitable for a fireplace. Settlers often built separate kitchens and used metal stoves and carefully placed chimneys. Pest control is another matter. Rodents prefer warm places with lots of grain
The history of straw bale construction
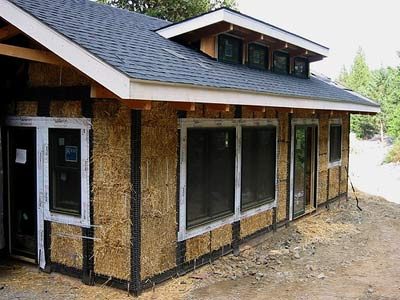
It probably starts with the practical memory. Some early settlers may remember New Englanders stacking hay bales to protect the ice from the heat. Some may be inspired by the mechanical balers that were just beginning to produce dense, easy-to-handle straw bales. In the late 1890s, settlers in the Sandhills of Nebraska began building houses, schools, and churches out of straw. They stacked the bales high in square or rectangular one-story structures and covered them with simple pitched roofs.
These things don’t last forever. At least not at first. The earliest recorded straw bale structure is a one-room schoolhouse built around 1896 or 1897. In 1902, cows ate through the walls because they were not protected with plaster. Things changed when the settlers figured out how to plaster the bales. The walls can adjust the temperature, making the room warmer in winter and cooler in summer. They endured the winds of the Nebraska prairie. They were quiet. Historians interviewed a woman who remembered her parents playing cards in their straw bale house while a tornado tore through the landscape outside. They didn’t even hear it.
When cement became the standard around World War II, straw bale buildings gradually disappeared from Nebraska. Today we remember the myth of the three little pigs. The big bad wolf huffing and puffing until the straw house collapsed. But if a pig had a baler and plaster, he would have a fort. In straw bale homes, straw bales are used as insulation or as the main structural block. The walls are finished with plaster. This is a natural construction method that has attracted attention recently. In 2001, a British company estimated that around 1,000 new straw bale structures are built every year around the world.
Why build a straw bale house?
Wood prices are rising. Availability is shrinking. Straw is a renewable natural resource and a byproduct of grain farming. Farmers use small amounts of fertilizer for fertilization, but most of it is wasted. In the United States, 200 million tons of straw go unused every year. Since straw is available in most parts of the country, the transportation costs of construction have decreased significantly. The construction industry and the related transport industry account for more than 50% of all greenhouse gas emissions. These savings are significant.
Straw is cheaper than brick or wood. However, the construction costs of straw bale houses are typically the same as for traditional homes. The wall budget is only 10-15 percent of the total construction budget. You still have to pay for the foundation, roof, windows and doors. These prices raise the prices to the level of traditional construction.
You can save money depending on who is using the hammer. Straw bale raising parties are a modern version of barn raising. Neighbors and friends stacked the bales like building blocks. You don’t need a lot of experience to participate. You can move quickly. There are websites and DVDs where you can learn how to build your own bale house. But be realistic. Learn what you can handle yourself and what you should hire a contractor to do.
The real money is in energy efficiency. Straw bales sealed with plaster have a high R-value. This indicator measures the insulation resistance of the wall. Straw walls provide incredible insulation, keeping heat in and out as needed. Straw bale homes can save up to 75% in annual heating and cooling costs. This is a huge savings over the life of your home. The thick walls also provide excellent sound insulation. Builders use this method for studios and homes near busy highways.
Necessary materials and tools
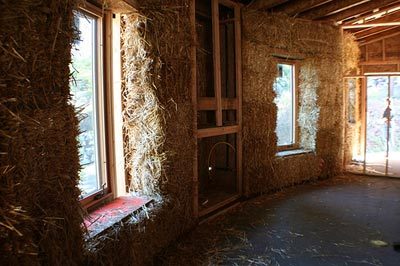
If you are planning a DIY project, you need to get the bales right. A dense bale is needed. Loose, fluffy straws will not work. Too much settling creates voids and lowers the R-value. Look for tight, rectangular bales. Standard dimensions are typically 18 inches by 14 inches by 4 feet. This size fits perfectly into standard frames and is easy to stack.
Obviously you need a baler. When buying bales from farmers, specify “half cut round bales” or “rectangular bales”. Rectangular bales are easy to stack without gaps. Check for mold or rot. Wet straw is not good. Structural integrity can be compromised and pests can be attracted.
The next important component is plaster. You need a base coat and a top coat. The base coat is usually a lime- or cement-based plaster. Durability is required. The finish coat can be clay, lime or acrylic. Clay plaster is popular for its moisture-regulating properties. Helps keep the straw dry. Dry straw is stable straw.
Tools include a staple gun for hardware cloth. You need a heavy-duty staples. A ladder is essential for the upper walls. A trowel for finishing the rendering. A level to keep the bales straight. A string line to make sure the wall is plumb. If the walls are crooked, cracks appear in the plaster.
Safety and construction considerations
Straw is flammable. This is an obvious concern. However, plaster bales are fire-resistant. The plaster acts as a fire barrier. It seals the straw from oxygen. However, you must comply with local building regulations. Some areas may have strict regulations regarding combustible materials. Check with your local building department before starting.
Moisture is your enemy. Water gets into the walls, the straw rots. The structure fails. Sufficient roof overhang is required. At least 2 feet. This prevents rainwater from falling on the wall. A moisture barrier is needed on the exterior side of the plaster. Depending on your climate, you may need to install a vapor barrier on the inside. In hot and humid climates, you may need to rethink your interior finish. Clay plaster breathes. In cold climates, it helps prevent condensation in wall cavities.
The foundation must be solid. Straw bales are heavy. They need a stable base. Concrete slab or pier foundations work well. The foundation must extend above the ground. This prevents soil moisture from wicking up into the bales. Capillary action is real. It is not desirable to have wet straw at the base of your house.
Wind resistance is another factor. The bales are stacked rather than nailed together. Weights and plaster keep them in place. However, you need to make sure that the roof is securely attached. High winds can lift the roof. Once the roof is off, the walls are exposed. Fasten rafters and trusses properly.
Build a wall
Start with the foundation. Mark out the perimeter. Check for level. Lay down the first

Fire safety myths and reality
The idea that a house made of dried plants is flammable is intuitive. This is also wrong. In fact, straw bale buildings are about three times more fire resistant than regular wooden houses. The logic is simple. Loose straw is flammable. Packed straw? Not so much. Squeezing the bale too hard squeezes the oxygen out. Without oxygen, it is difficult to burn. Plastering the exterior and interior walls provides an extra layer of protection. It seals the bales.
Tests prove this. The National Research Council of Canada conducted experiments with straw bale walls. The structure is exposed to temperatures up to 1,850°F (1,010°C). The wall remained stable for 2 hours. They didn’t melt. They didn’t collapse. They just sat there and took the heat.
Choose the right material: straw instead of hay
If you make this mistake from the beginning, the whole project will fail. You need straw. No need for hay.
Hay is for cattle. It’s rich in leafy material. animals love it. When you build a building out of hay, you basically invite a buffet into your walls. Straw is the hollow stem that remains after harvesting the grain. It has no nutritional value for rodents.
Properly packed straw walls sealed with plaster form a barrier against the entry of pests. Even if a mouse got there, there would be nothing to eat. Compare this to traditional frames. Drywall and insulation create dark and warm corners. Rodents breed in these cracks. Straw bale houses take away their comfort.
It also has a health aspect. If you suffer from hay fever, it is safer to use a straw. It lacks the pollens found in hay. It’s breathable. Proponents claim it outperforms modern synthetic materials that release formaldehyde. Unlike hay, which decomposes naturally, straw is difficult to decompose unless nitrates are added. Stability is important.
Site Planning and Orientation
Stacking bales is not an impromptu DIY project. The design must be in harmony with the environment. We don’t just make boxes. You build a housing that interacts with the sun and wind.
Before you buy a single bale, survey the land.
- The path of the sun: Where does the light fall in winter? Where does it explode in the summer?
- Wind pattern: In which direction is the prevailing wind blowing? Can you block it with a tree?
- Flow: Where does the rainwater flow? You need to know this in order to place your foundation correctly.
This information determines the position of the window. In the cold months, the large south-facing windows let in passive solar heat. Overhangs can block the high summer sun. The trees act as wind protection and reduce the heating load in winter.
The goal is efficiency. Let nature do the heavy lifting. If you dispute with the site, you will have to pay with your electricity bill. If you work with it, the house stays comfortable with less effort. It’s not just about stacking. It’s about strategic placement. If you get it wrong, you lose the thermal advantage.

When you think of straw bale construction home, it’s more than just stacking hay. Structural choices determine how your home will withstand the effects of gravity, weather and building inspectors. The method you choose changes everything from the foundation to the location of the windows.
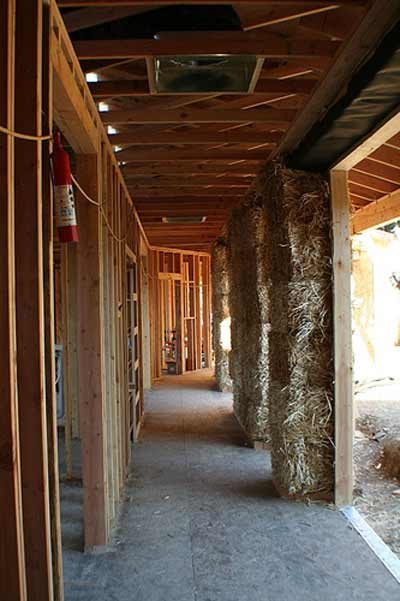
There are basically two paths. The first is the column and beam filling. Here, a traditional wooden or steel frame supports the roof loads. Straw bales were placed between the posts. They act as insulators rather than structures. This approach is often safer when dealing with skeptical building authorities, lenders and insurance companies. It looks like a standard stick-built house and is easy to finance.
Load capacity options
The second is a load-bearing method. People also call this type of architecture Nebraska style. This is because the pioneers of the Sandhills first built this structure. There are no skeletons. The bales themselves support the roof.
This method may seem primitive to some, but it is very effective. Requires less resources. Building walls requires fewer skilled workers than building a house from scratch. The density of straw forms a strong wall that is essentially solid.
However, there are serious limitations.
Bearing walls cannot support the second floor. You are restricted to one story. If you’re creative with your engineering, you might be able to squeeze in a loft, but the walls below have to support the weight of the roof, not the entire upper floor joists.
There are also restrictions on the length of the wall. Building dimensions generally require that unsupported walls not exceed 25 feet in any direction. If you need a longer wall, you need to install supports.
“Doors and windows are limited to 50% of the wall area.”
Check local regulations, but the 50% rule is the general standard. Achieving wide open glass walls here is more difficult than a post and beam installation.
Where are straw bale houses most efficient?
You might think that straw bales are only suitable for dry desert climates. This movement is strong in the American Southwest and Southern California. This logic is valid. In extreme temperatures, the high R-value of straw walls can effectively block excess heat and cold air.
However, moisture is the enemy. A humid climate does not look good. However, people have successfully built straw bale houses in the rainy Pacific Northwest and New England during cold, snowy winters. The key is getting the details right. You need to protect the bales from direct rain and soil moisture.
The humid climate is still a problem. If it is not completely sealed and ventilated, high ambient humidity can lead to rotting of the walls.
The Straw Bale Registry tracks these structures. Their database shows global interest. Most of the registrations are in the United States and China. However, if material limitations are met, this technique can be performed almost anywhere.
Straw bale type
Not all straw bales are the same. Selecting the right straw is an important element in the design. Typically, you will come across two-string bales and three-string bales. The name comes from the thread or thread that holds them together.
Sizes vary widely, according to the US Department of Energy.
- Two-string bale : Measures 18 x 14 x 36 inches. The weight is 50 and 60 pounds.
- Three-string bale : Measures 23 x 16 x 42 inches. The weight is 75 and 80 pounds.
Estimate your quantity using an online bale calculator like Harvest Homes. Enter the dimensions of the wall. Different sizes change its layout and need.
Procurement and security
These bags can be bought at feed stores or directly from farmers. Buying locally reduces transport emissions and supports local agriculture.
However, you should choose a dry bag. The biggest risk in straw bale construction is mold. Check the content with a hand-held moisture meter. A moisture level of 20% is considered safe to use in architectural applications. If the reading is high, send it back.
Visual cues can also be helpful. Look for bales with a golden color. Bright green straw indicates a high moisture content. The bales should be tightly strung. Pick one up. Drop it gently. It should keep its shape. If it’s disintegrating or spongy, it’s not ready to stick to the wall.
Construction logistics
Once you’ve chosen your approach, the design process will reflect traditional home architecture. Can be used with any foundation. You can choose any roof style.
Many builders want to install solar panel roofs. This strengthens the environmental friendliness of the project. It blends perfectly with the energy efficiency of thick straw walls. We strive to build homes that use less energy for heating and cooling.
In the remaining finishing works (stucco, windows, electricity), the straw becomes a hidden hero. It’s buried inside the wall. It does not affect your interior design choices. You just have to decide how to get there.

Bundle and create a base
The roof frame rests on straw. The roof is assembled. In a post and beam bale house, first install the foundation, frame and roof in place. Then just fill the gaps between the posts with straw.
However, both approaches must have one thing in common. You have to raise those bales off the ground. A few inches up. When it comes in contact with dirt, it absorbs moisture. Rot follows.
Builders call this solution toe-ups. They are platforms made of lumber and gravel. They attach directly to the concrete base. You can hammer nails or pins into these toes. Then drop the bales onto the nails. The nails hold the bale in place.
Cutting and fitting the bales
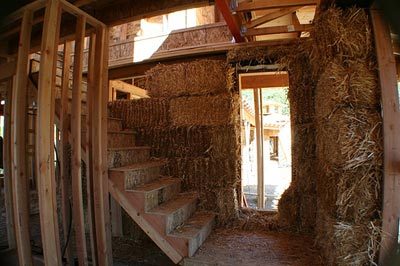
The first bale is on the toe. Stack the rest like building blocks.
Doors and windows need a home in the straw. Includes a wooden frame. Cut. You notch. Tie the knot again. Use baling needles to get a bale into a specific shape or size. These look like large sewing needles. Cut the thread and fasten it with a new rope.
Chainsaws can handle the notches. They carve out for wooden posts.
Cut the straw deeper
When the pile was finished, the chainsaw came out again.
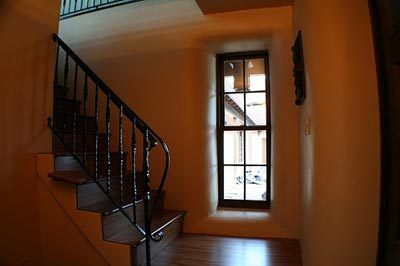
It creates a niches. Window seats. It also has heavy features like cabinets. The upper cabinet are too heavy for with plaster. So insert a pieces of lumber with spikes into the straw. Support the cabinet during installation.
Electrical cables can be can go directly to the wall. First, wrap it in a plastic sheathing. Plumbing are different. Keep it out from the walls of the bale as possible. Use internal walls for pipes.
Stabilization and plastering
Stacking is complete. Now you stabilize.
Some builders slide giant steel or bamboo poles down from the top of the bale stack. This holds everything in place. Some just use pegs and wire mesh.
Then it’s plastered.
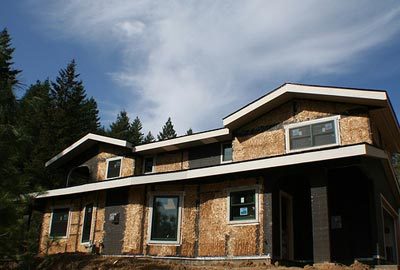
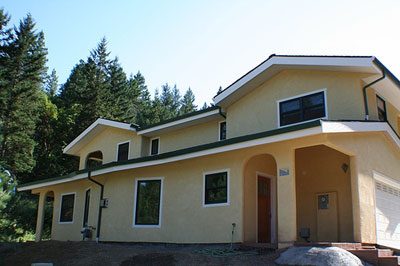
stucco cement. Gypsum plasters. Earth plaster. lime. These are serve as the internal and external plaster.
The first plaster layer works into the straw. Next, apply two more layers.
This is a trap. You might think it needs waterproofing. You don’t.
“The straw will move the moisture on its own, but the plaster needs to remove the moisture instead of holding it next to the bale.”
The Waterproofing traps moisture against the bale. This can cause rot. The plaster should let the straw breathe.
Painting the walls is also important. Breathability is required. lime paint. Silicate paint. latex paint.
Apply the plaster correctly. Paint correctly. This prevents moisture from rotting the straw from the inside.
How long does the plaster take to cure? Days. Probably a few weeks. Depends on the humidity. The straw waits.
Management of moisture threats
Water is your enemy. Especially the moisture inside the bale. If the straw gets wet, mold can form. Mold eats straw. Corruption has begun. We cannot allow this to happen.
It starts before the first bale is stacked.
Buy wisely. But more important is to store it properly.
When rainwater hits the chimney on site, the insulation is compromised. Don’t let this happen. Keep the bales off the ground. Use pallets and blocks. Cover immediately with a sturdy tarp. This is not an option. This is basic damage control.
Dry styling
The roof must be protected from water coming from the walls.
See crossing over. deep. It works like an umbrella. Rain, snow, sleet – they all make me want plaster. The basics are also important. Ground spraying keeps the ground dry.
The window frame must be tilted. outside. Therefore, the water does not come in, but flows out.
common? Please close it. careful.
You build a system. The purpose is to prevent liquid water from entering from the outside. It also allows moisture from the air to escape from the inside. This is where a breathable bandage comes in handy. No moisture build-up. they missed it.
Cracks and maintenance
This is the problem.
The plaster is cracking. they have to do this. The house is finished. A squeeze of straws.
Cracks are a major maintenance problem.
Why are cracks important? Because they open the door to allow moisture to “enter” the wall cavity. If moisture accumulates, it will rot.
We have to be careful in such cracks. Close it when it appears. Small cracks can become big problems. This is a cycle. Explore. sealant. to maintain
Is there a maintenance fee? perhaps. But the alternative is a moldy house. Nobody wants this.
You are building a living wall. It breathes. It shrinks. It spread. Please respect that.

Overcoming the bureaucracy of straw bale construction
Shame isn’t just in your head. It is listed in the building codes.
The biggest obstacle is not the straw bale itself, as straw bale construction is still a niche market in the wider housing market. It’s perception. If you’re going to build a straw bale home, expect friction. Standard blueprints don’t always allow for walls that breathe and stack like giant toothpicks. It is often considered “experimental” and therefore “risky” by conservative lenders. Insurance agency? Same story. They want square footage and steel, not organic insulation.
You may have to jump through more hoops than a traditional builder.
In areas where straw bales aren’t common, you can’t just send in your plans and walk away. You have to work the officials. You have to show them the math. You have to prove that your walls can stand the test of wind, fire and time. You need data to get a loan. hard data.
Be prepared to explain the method to someone who has never seen a haystack. You can also hire an independent consultant to review your plan. Their stamp of approval could be the difference between your loan being approved and denied. They vouch for you. They guarantee this method.
Find Straw Bale Contractor in the mainstream market
The shortage of skilled workers is real.
You won’t find many general contractors who know how to mix plaster and straw. The market is small. The Last Straw is a quarterly magazine dedicated to this style and maintains a list of resources. This is the starting point. There is also a Green Builder directory. These are your directories.
If you can’t find a full service builder, break it down. Look for subcontractors who specialize in critical layers. Plastering is the key. A bad plaster job can ruin a bale wall faster than a bad bale stack. It is important that your roofer understands the overhangs required for rain protection.
You become the general manager.
This requires knowledge. You need to know how to direct these specialists. You are the bridge between their trades and the unique structural needs of straw. If you don’t speak their language, the wall fails.
Reality Check of the resale
Selling straw bale home can be difficult.
Little is known about the resale value. One reason for this is that the people who built these houses rarely left their homes. The attachment is high. However, if data exists, straw bale houses may be valued less than traditional brick houses.
Why? The Appraisers look for comps. They are looking for similar homes that have recently sold. If there are no comps, the value decreases.
This is where your education becomes important.
You need to explain your value proposition to buyers. It’s not about aesthetic appeal. The economics. A well-insulated straw bale home has lower heating and cooling costs. It has thermal mass. It has durability. If you can show the buyer long-term savings, you may end up paying more than the appraisal. This is not only a negotiation of square footage, but also of value.
Additions and Retrofits straw bales
You don’t have to tear down your current home to get started.
If you already live in a traditional house, you can use straw bales. Additions are the easiest entry point. Straw bale sunroom. studio. guest cabin.
Retrofits are harder. You work in an existing structure. Moisture control is even more critical. You need to make sure that the new walls do not trap humidity in your old ones. But it is possible.
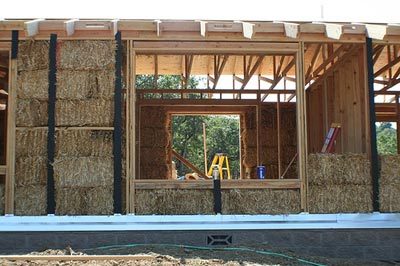
Adding straw bales to existing structures
Installing a new bale wing in an existing home is more than just gluing the walls together. Structural integrity and moisture management are required from the start. New additions must be tied tightly to the existing structure.
Place the first row of bales. Place a metal mesh (known as lath) over the straw. Fasten with pins or landscape pins. Next, fold the slats at an exact 90 degree angle. Nail them directly to the existing house structure.
To make the addition easier, you can use a wooden frame. Attach the new frame directly to the frame of the house. No mesh needed there.
The same rules are followed for plastering as for new construction. But don’t skimp on the preparation. A contractor can help you create a harmonious look. that’s good. However, if you want precision, you’ll have to handle the basics yourself.
Foundation and moisture management
The foundation must take into account the extra volume. Consider the thickness of the bales and the plaster layer. If you don’t do this, the finished wall will not match the existing house. This causes weird step on the joints.
Extend the foundation to support the new width. Attach the new concrete to the old foundation with epoxy or anchor bolts. This locks the two structures together.
Toe-ups are mandatory. These are short vertical studs that hold the straw off the ground. Moisture wicks up from the concrete. The straw rots. It’s that simple.
Makeover: Wrap your house in straw
Renovating an existing home is also possible. Wrap the outside with straw to increase energy efficiency. This is a major undertaking. Moisture protection should be prioritized in the design.
Straw bales hate water. A large overhanging roof is your best friend. They keep rain from hitting the wall. Renovations often require changes to the existing roof line. You may need to increase the slope and extend the eaves.
This means a larger footprint for the foundation. The new part must support the increased bale width. Again, use anchor bolts to connect the new foundation to the old foundation.
Building toe-ups keeps the bales dry. However, this is the difference between renovation and new construction. You don’t stack dry bales to be stacked first and then plastered. Before stacking, dip the bales in earthen-based plaster.
“Before stacking, the bales must be dipped in an earthen-based plaster. This way, plaster is on the bales before being placed in the house.”
This pre-plastering will save you time later. It also forms an immediate moisture barrier.
Ventilation and window challenges
Never tie the bales flush as the siding of your home. There is a risk that the trapping moisture from the siding inside the straw. That’s a rot factory.
Install steel mesh between the house and the bales. Create a gap for ventilation. Air needs to circulate.
Windows and doors become tricky. A standard 18-inch bale creates a deep well. All window and door openings must be trim and reframe. It’s extra labor.
Another option is interior renovation. Place the bales on the inside the house. The process is similar. Avoids window depth problems. However, you lose square footage of interior space. The width of the bales eats into in living spaces.
Measuring costs
Some of these steps may seem tedious. Change the roofline. Pouring new foundation. Retrofitting windows.
Looks expensive. Maybe so. But look at the long game.
Weigh the initial construction costs against the energy savings over the life of the home. Straw bale houses last for decades. They keep heat in during winter and out during summer. The insulation value is massive.
The money saved on heating and cooling. Quickly.
Is it worth the effort? For many people, yes. The comfort is real. Low carbon footprint. It is built from discarded materials. It’s a choice every time you turn on the thermostat.
What about aesthetics? This is unique. Not every house looks like a box. It has texture. It breathes.
There are always compromises. It’s usually somewhere between the initial cost and the long-term benefit. Straw bale forces you to look further. Most people stop looking when the bill arrives. Don’t be most people.